

Notepad++ is a free open source text editor for Windows that supports lots of programming languages and features. Notepad++ supports tabbed editing that allowing you to work with multiple open files in a single window. One of the most useful features of Notepad++ is plugin support. If you’ve never used plugins with the app, you may not know how to install, update, and remove plugins in Notepad++.
Notepad++ has a plugin manager called Plugins Admin that allows you to install, update and remove plugins from Notepad++. Plugin manager also notifies you when an installed plugin has an update available and allows you to update directly. Check below How to Install, Update, and Remove Plugins in Notepad++ using the Plugin Manager.
How to Install, Update, and Remove Plugins in Notepad++
How to Install Plugins Manager in Notepad++
There are two ways to install Notepad++ Plugin Manager, first simply download the .zip file and place the PluginManager.dll file in the Notepad++ plugins directory, and the gpup.exe in the updater directory under your Notepad++ program directory and the second one is choosing custom setting while installing Notepad++.
Method 1:
- If you’ve already installed Notepad++, uninstall it and keep your custom settings.
- Download and Install the Notepad++
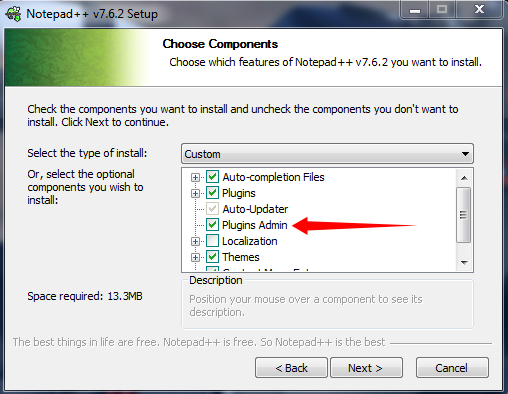
- While installing on the Choose Components screen, select Custom from the dropdown list.

- Check the Plugins Admin box in the list.
- Click Next.
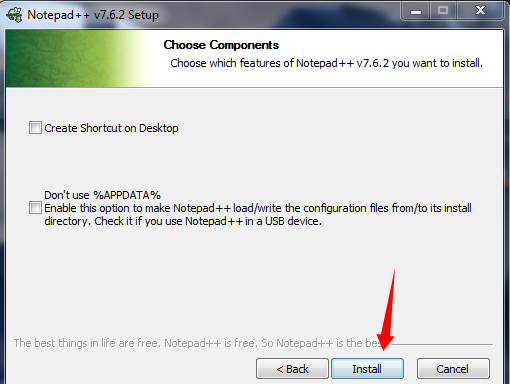
- If you plan to move Notepad++ to a USB flash drive, then check the Don’t use %APPDATA% box on the following Choose Components screen.

Method 2:
- Download and Install the Notepad++ on your Windows.
- Download Notepad++ Plugin Manager latest version.
- Unzip the file.
- Copy PluginManager.dll to C:\Program Files\Notepad++\plugins or C:\Program Files (x86)\Notepad++\plugins (If using 32bit version).
- And copy gpup.exe to C:\Program Files\Notepad++\updater or C:\Program Files (x86)\Notepad++\updater (If using 32bit version).
- Restart the Notepad++
How to Install Plugin using Plugin Manager
There are two ways to Install plugins in Notepad++. First one is using the plugin manager and the second one is without Plugin admin, the manual method. Check below How to Install Plugin using Plugins Admin.
Method 1:
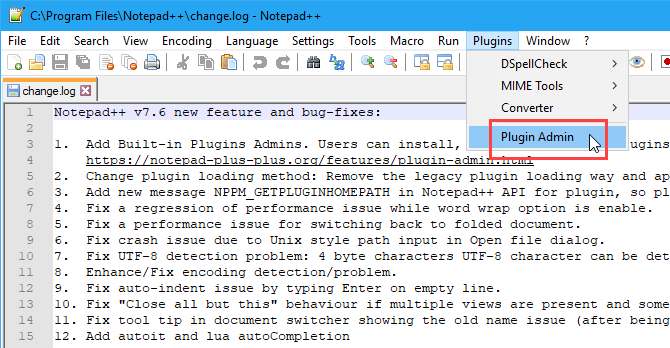
- Open Notepad++
- Go to Plugins>Plugins Admin to open the Plugins Admin.

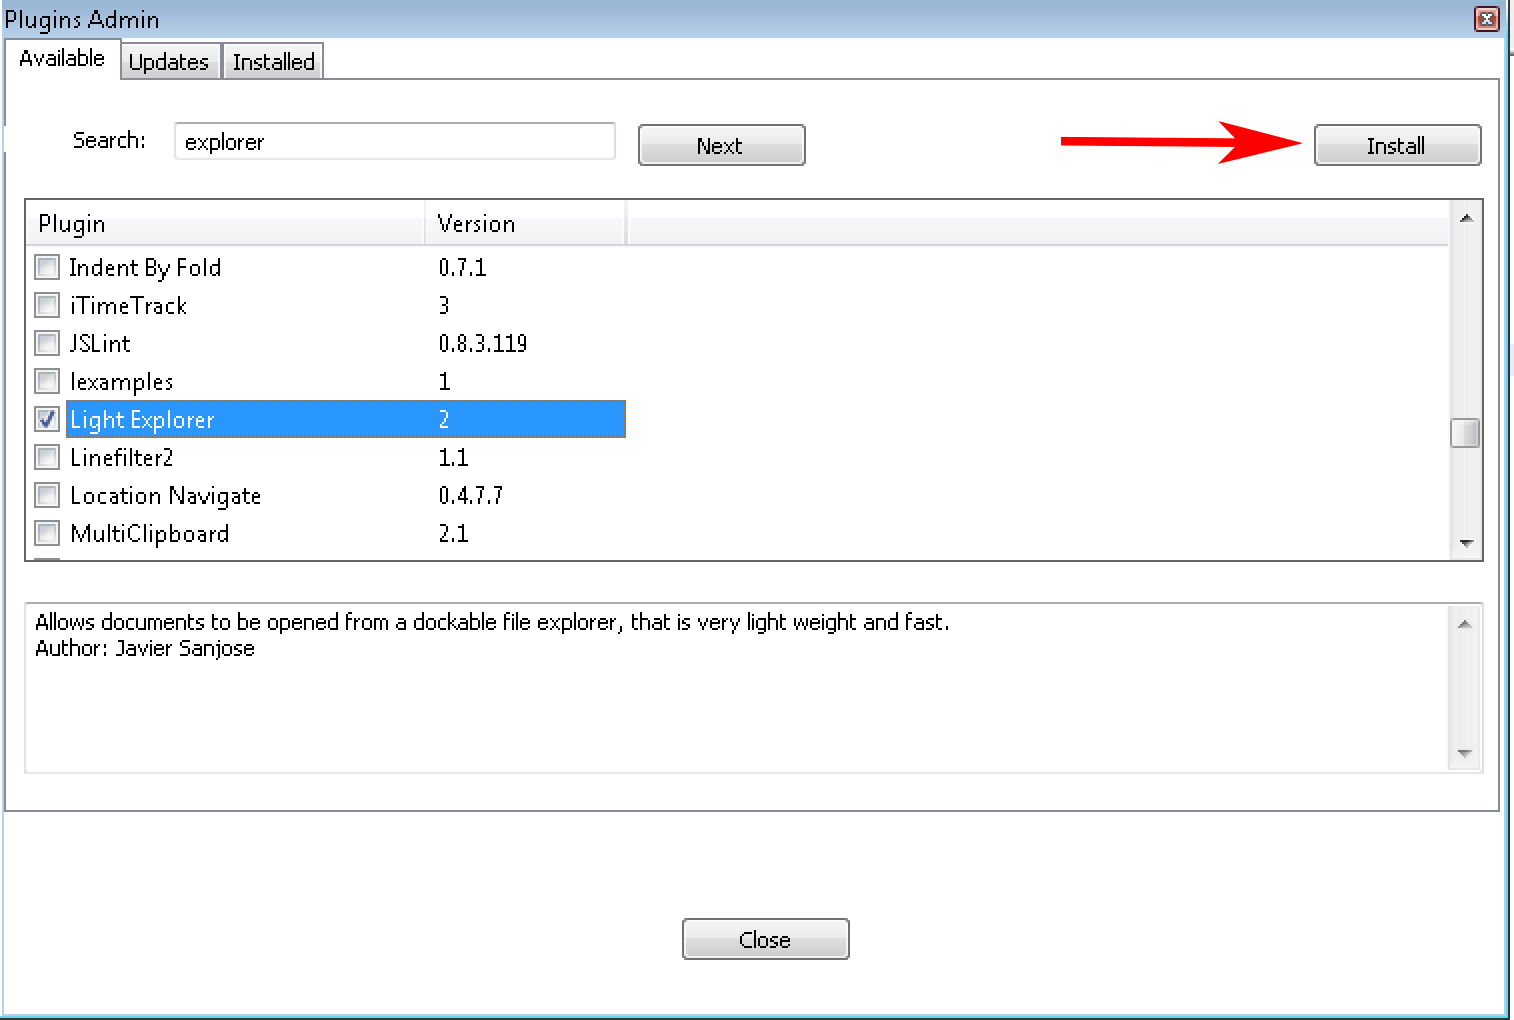
- Select the plugin you want to install.
- Click the Install button to install the plugin.

- The Plugins Admin dialog box automatically closes
- You’ll see a warning popup telling you that Notepad++ will exit and restart to complete the installation.
- Click Yes.
- Once restarted, you’ll see the installed plugin on the Plugins menu.
Method 2:
- First Download the plugin you want to Install using Notepad++ Plugin Resources or another site.
- Close the Notepad++.
- If you didn’t check the Don’t use %APPDATA% box during the installation of Notepad++ then go to the %LOCALAPPDATA%\Notepad++\plugins folder.
- If you check the Don’t use %APPDATA% box then go to C:\Program Files\Notepad++\plugins folder.
- Now Copy the downloaded plugin zip file to one of the above locations and extract it. Make sure the extracted plugin file has a folder and inside that folder contain at least one DLL file.
- Open the Notepad++, the plugin should appear in the Plugins menu in the app.
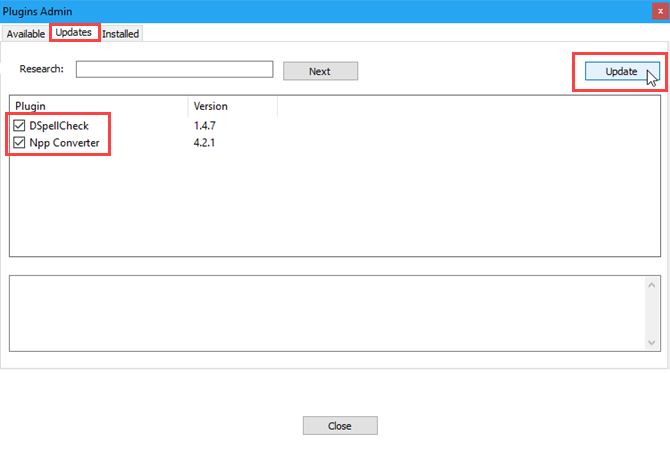
How to Update Notepad++ Plugins
Updating Notepad++ plugin is as simple as installing it. You can easily update the plugin from the Updates tab on the Plugins Admin dialog box. Check below steps toupdate Notepad++ plugins.
- To check for updates, go to Plugins > Plugin Admin.
- Click the Updates tab.
- Check the box for the plugin you want to update and then click Update.

- You’ll see the Notepad++ exit popup box, Click Yes.
- Notepad++ will restart with the most current version of the selected plugin.
How to Remove Notepad++ Plugins
There are two ways to Remove Installed Notepad++ Plugins. First one is using the plugin manager and the second one is without Plugin admin, the manual method. Check below How to Remove Notepad++ Plugins.
Method 1:
- Open Notepad++
- Go to Plugins>Plugins Admin and click the Installed tab.
- Select the plugin you want to remove and Click the Remove button.
- Once restarted, you’ll see the removed plugin move to the available tab.

Method 2:
- Open the Notepad++.
- If you didn’t check the Don’t use %APPDATA% box during the installation of Notepad++ then go to the %LOCALAPPDATA%\Notepad++\plugins folder.
- If you check the Don’t use %APPDATA% box then go to C:\Program Files\Notepad++\plugins folder.
- Select the folders for the plugins you want to remove and press Delete or Shift + Delete to delete them permanently.
Wrapping Up:
If you are using Notepad++ then you must install the Plugins Admin to manage your plugins. You can also in Get More Notepad++ Plugins from the Plugin Resources web page. You can get the option on the toolbar, click on ? > Get More Plugins. We covered How to Install, Update, and Remove Plugins in Notepad++ both manual or via Plugin Manager. Let us know if you have any queries about the article.